MongoDB setup in Windows:
The following steps can be used to install MongoDB on Windows 10
Step 1) Go to link and Download MongoDB Community Server. We will install the 64-bit version for Windows.

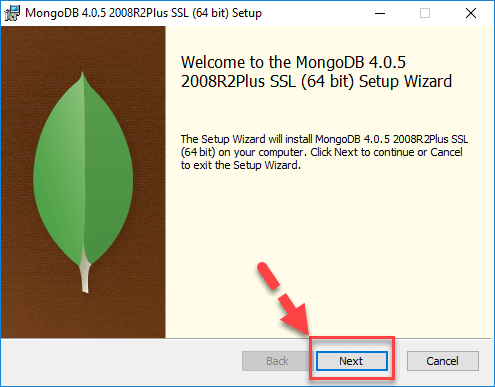
Step 2) Once download is complete open the msi file. Click Next in the start up screen
Step 3)
- Accept the End-User License Agreement
- Click Nest

Step 4) Click on the "complete" button to install all of the components. The custom option can be used to install selective components or if you want to change the location of the installation.

Step 5)
- Select “Run service as Network Service user”. make a note of the data directory, we’ll need this later.
- Click Next

Step 6) Click on the Install button to start the installation.

Step 7) Installation begins. Click Next once completed

Step 8) Click on the Finish button to complete the installation

Hello World MongoDB: JavaScript Driver
Drivers in MongoDB are used for connectivity between client applications and the database. For example, if you had Java program and required it to connect to MongoDB then you would require to download and integrate the Java driver so that the program can work with the MongoDB database.
The driver for JavaScript comes out of the box. The MongoDB shell which is used to work with MongoDB database is actually a javascript shell. To access it
Step 1) Go to " C:\Program Files\MongoDB\Server\4.0\bin" and double click on mongo.exe. Alternatively, you can also click on the MongoDB desktop item

Step 2) Enter following program into shell
var myMessage='Hello World';
printjson(myMessage);
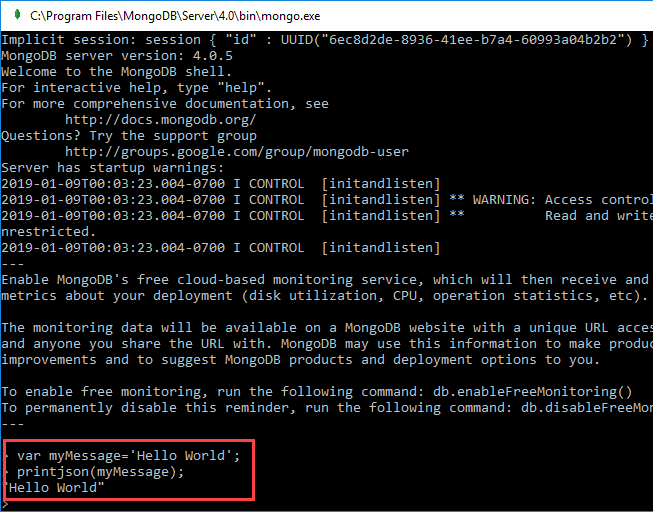
Code Explanation:
- We are just declaring a simple Javascript variable to store a string called 'Hello World.'
- We are using the printjson method to print the variable to the screen.
Install Python Driver
Step 1) Ensure Python is installed on the system
Step 2) Install the mongo related drivers by issuing the below command
pip install pymongo
Install Ruby Driver
Step 1) Ensure Ruby is installed on the system
Step 2) Ensure gems is updated by issuing the command
gem update -system
Step 3) Install the mongo related drivers by issuing the below command
gem install mong
Install MongoDB Compass- MongoDB Management Tool
There are tools in the market which are available for managing MongoDB. One such non-commercial tool is MongoDB Compass.
Some of the features of Compass are given below:
- Full power of the Mongoshell
- Multiple shells
- Multiple results
Step 1) Go to link and click download

Step 2) Enter details in the popup and click submit

Step 3) Double click on the downloaded file

Step 4) Installation will auto-start

Step 5) Compass will launch with a Welcome screen

Step 6) Keep the privacy settings as default and Click "Start Using Compass"

Step 7) You will see homescreen with list of current databases.

MongoDB Configuration, Import, and Export
Before starting the MongoDB server, the first key aspect is to configure the data directory where all the MongoDB data will be stored. This can be done in the following way

The above command 'md \data\db' makes a directory called \data\db in your current location.
MongoDB will automatically create the databases in this location, because this is the default location for MongoDB to store its information. We are just ensuring the directory is present, so that MongoDB can find it when it starts.
The import of data into MongoDB is done using the "mongoimport" command. The following example shows how this can be done.
Step 1) Create a CSV file called data.csv and put the following data in it
Employeeid,EmployeeName
- Guru99
- Mohan
- Smith
So in the above example, we are assuming we want to import 3 documents into a collection called data. The first row is called the header line which will become the Field names of the collection.
Step 2) Issue the mongo import command

Code Explanation:
- We are specifying the db option to say which database the data should be imported to
- The type option is to specify that we are importing a csv file
- Remember that the first row is called the header line which will become the Field names of the collection, that is why we specify the –headerline option. And then we specify our data.csv file.
Output

The output clearly shows that 3 documents were imported into MongoDB.
Exporting MongoDB is done by using the mongoexport command

Code Explanation:
- We are specifying the db option to say which database the data should be exported from.
- We are specifying the collection option to say which collection to use
- The third option is to specify that we want to export to a csv file
- The fourth is to specify which fields of the collection should be exported.
- The –out option specifies the name of the csv file to export the data to.
Output

The output clearly shows that 3 records were exported from MongoDB.
Configuring MongoDB server with configuration file
One can configure the mongod server instance to startup with a configuration file. The configuration file contains settings that are equivalent to the mongod command-line options.
For example, supposed you wanted MongoDB to store all its logging information to a custom location then follow the below steps
Step 1) Create a file called, "mongod.conf" and store the below information in the file

- The first line of the file specifies that we want to add configuration for the system log file, that is where the information about what the server is doing in a custom log file.
- The second option is to mention that the location will be a file.
- This mentions the location of the log file
- The logAppend: "true" means to ensure that the log information keeps on getting added to the log file. If you put the value as "false", then the file would be deleted and created fresh whenever the server starts again.
Step 2) Start the mongod server process and specify the above created configuration file as a parameter. The screenshot of how this can be done is shown below

Once the above command is executed, the server process will start using this configuration file, and if you go to the /etc. directory on your system, you will see the mongod.log file created.
The below snapshot shows an example of what a log file would look like.

MongoDB Crude Operations
Create operation – Create operation or Insert operation are used to add new documents to the collection and if the collection does not exist, it creates one.
Following command can insert a document on the collection – db.collection.insert()
Read operation – This operation reads the documents from the collection. This process is taken place by executing a query.
The command to read the document is – db.collection.find()
Update operation – Update operation is used to modify an existing document.
The command that updates a document is – db.collection.update()
Delete operation – Delete operation erases the document from the collection.
Following command performs the operations – db.collection.remove()
Mongo DB Projection:
In MongoDB, projection means selecting only the necessary data rather than selecting whole of the data of a document. If a document has 5 fields and you need to show only 3, then select only 3 fields from them.
The find() Method
MongoDB's find() method, explained in MongoDB Query Document accepts second optional parameter that is list of fields that you want to retrieve. In MongoDB, when you execute find() method, then it displays all fields of a document. To limit this, you need to set a list of fields with value 1 or 0. 1 is used to show the field while 0 is used to hide the fields.
Syntax
The basic syntax of find() method with projection is as follows −
>db.COLLECTION_NAME.find({},{KEY:1})
Example
Consider the collection mycol has the following data −
{ "_id" : ObjectId(5983548781331adf45ec5), "title":"MongoDB Overview"}
{ "_id" : ObjectId(5983548781331adf45ec6), "title":"NoSQL Overview"}
{ "_id" : ObjectId(5983548781331adf45ec7), "title":"Tutorials Point Overview"}
Following example will display the title of the document while querying the document.
>db.mycol.find({},{"title":1,_id:0})
{"title":"MongoDB Overview"}
{"title":"NoSQL Overview"}
{"title":"Tutorials Point Overview"}
>
Please note _id field is always displayed while executing find() method, if you don't want this field, then you need to set it as 0.
Mongo DB Limiting:
In this chapter, we will learn how to limit records using MongoDB.
The Limit() Method
To limit the records in MongoDB, you need to use limit() method. The method accepts one number type argument, which is the number of documents that you want to be displayed.
Syntax
The basic syntax of limit() method is as follows −
>db.COLLECTION_NAME.find().limit(NUMBER)
Example
Consider the collection myycol has the following data.
{ "_id" : ObjectId(5983548781331adf45ec5), "title":"MongoDB Overview"}
{ "_id" : ObjectId(5983548781331adf45ec6), "title":"NoSQL Overview"}
{ "_id" : ObjectId(5983548781331adf45ec7), "title":"Tutorials Point Overview"}
Following example will display only two documents while querying the document.
>db.mycol.find({},{"title":1,_id:0}).limit(2)
{"title":"MongoDB Overview"}
{"title":"NoSQL Overview"}
>
If you don't specify the number argument in limit() method then it will display all documents from the collection.
MongoDB Skip() Method
Apart from limit() method, there is one more method skip() which also accepts number type argument and is used to skip the number of documents.
Syntax
The basic syntax of skip() method is as follows −
>db.COLLECTION_NAME.find().limit(NUMBER).skip(NUMBER)
Example
Following example will display only the second document.
>db.mycol.find({},{"title":1,_id:0}).limit(1).skip(1)
{"title":"NoSQL Overview"}
>
MongoDB Indexing:
Indexes support the efficient resolution of queries. Without indexes, MongoDB must scan every document of a collection to select those documents that match the query statement. This scan is highly inefficient and require MongoDB to process a large volume of data.
Indexes are special data structures, that store a small portion of the data set in an easy-to-traverse form. The index stores the value of a specific field or set of fields, ordered by the value of the field as specified in the index.
The ensureIndex() Method
To create an index you need to use ensureIndex() method of MongoDB.
Syntax
The basic syntax of ensureIndex() method is as follows().
>db.COLLECTION_NAME.ensureIndex({KEY:1})
Here key is the name of the field on which you want to create index and 1 is for ascending order. To create index in descending order you need to use -1.
Example
>db.mycol.ensureIndex({"title":1})
>
In ensureIndex() method you can pass multiple fields, to create index on multiple fields.
>db.mycol.ensureIndex({"title":1,"description":-1})
>
ensureIndex() method also accepts list of options (which are optional). Following is the list −
| Parameter | Type | Description |
|---|---|---|
| background | Boolean | Builds the index in the background so that building an index does not block other database activities. Specify true to build in the background. The default value is false. |
| unique | Boolean | Creates a unique index so that the collection will not accept insertion of documents where the index key or keys match an existing value in the index. Specify true to create a unique index. The default value is false. |
| name | string | The name of the index. If unspecified, MongoDB generates an index name by concatenating the names of the indexed fields and the sort order. |
| dropDups | Boolean | Creates a unique index on a field that may have duplicates. MongoDB indexes only the first occurrence of a key and removes all documents from the collection that contain subsequent occurrences of that key. Specify true to create unique index. The default value is false. |
| sparse | Boolean | If true, the index only references documents with the specified field. These indexes use less space but behave differently in some situations (particularly sorts). The default value is false. |
| expireAfterSeconds | integer | Specifies a value, in seconds, as a TTL to control how long MongoDB retains documents in this collection. |
| v | index version | The index version number. The default index version depends on the version of MongoDB running when creating the index. |
| weights | document | The weight is a number ranging from 1 to 99,999 and denotes the significance of the field relative to the other indexed fields in terms of the score. |
| default_language | string | For a text index, the language that determines the list of stop words and the rules for the stemmer and tokenizer. The default value is english. |
| language_override | string | For a text index, specify the name of the field in the document that contains, the language to override the default language. The default value is language. |
MongoDB Aggregation:
Aggregations operations process data records and return computed results. Aggregation operations group values from multiple documents together, and can perform a variety of operations on the grouped data to return a single result. In SQL count(*) and with group by is an equivalent of mongodb aggregation.
The aggregate() Method
For the aggregation in MongoDB, you should use aggregate() method.
Syntax
Basic syntax of aggregate() method is as follows −
>db.COLLECTION_NAME.aggregate(AGGREGATE_OPERATION)
Example
In the collection you have the following data −
{
   _id: ObjectId(7df78ad8902c)
   title: 'MongoDB Overview',
   description: 'MongoDB is no sql database',
   by_user: 'tutorials point',
   url: 'http://www.tutorialspoint.com',
   tags: ['mongodb', 'database', 'NoSQL'],
   likes: 100
},
{
   _id: ObjectId(7df78ad8902d)
   title: 'NoSQL Overview',
   description: 'No sql database is very fast',
   by_user: 'tutorials point',
   url: 'http://www.tutorialspoint.com',
   tags: ['mongodb', 'database', 'NoSQL'],
   likes: 10
},
{
   _id: ObjectId(7df78ad8902e)
   title: 'Neo4j Overview',
   description: 'Neo4j is no sql database',
   by_user: 'Neo4j',
   url: 'http://www.neo4j.com',
   tags: ['neo4j', 'database', 'NoSQL'],
   likes: 750
},
Now from the above collection, if you want to display a list stating how many tutorials are written by each user, then you will use the following aggregate() method −
> db.mycol.aggregate([{$group : {_id : "$by_user", num_tutorial : {$sum : 1}}}])
{
   "result" : [
      {
         "_id" : "tutorials point",
         "num_tutorial" : 2
      },
      {
         "_id" : "Neo4j",
         "num_tutorial" : 1
      }
   ],
   "ok" : 1
}
>
Sql equivalent query for the above use case will be select by_user, count(*) from mycol group by by_user.
In the above example, we have grouped documents by field by_user and on each occurrence of by_user previous value of sum is incremented. Following is a list of available aggregation expressions.
| Expression | Description | Example |
|---|---|---|
| $sum | Sums up the defined value from all documents in the collection. | db.mycol.aggregate([{$group : {_id : "$by_user", num_tutorial : {$sum : "$likes"}}}]) |
| $avg | Calculates the average of all given values from all documents in the collection. | db.mycol.aggregate([{$group : {_id : "$by_user", num_tutorial : {$avg : "$likes"}}}]) |
| $min | Gets the minimum of the corresponding values from all documents in the collection. | db.mycol.aggregate([{$group : {_id : "$by_user", num_tutorial : {$min : "$likes"}}}]) |
| $max | Gets the maximum of the corresponding values from all documents in the collection. | db.mycol.aggregate([{$group : {_id : "$by_user", num_tutorial : {$max : "$likes"}}}]) |
| $push | Inserts the value to an array in the resulting document. | db.mycol.aggregate([{$group : {_id : "$by_user", url : {$push: "$url"}}}]) |
| $addToSet | Inserts the value to an array in the resulting document but does not create duplicates. | db.mycol.aggregate([{$group : {_id : "$by_user", url : {$addToSet : "$url"}}}]) |
| $first | Gets the first document from the source documents according to the grouping. Typically this makes only sense together with some previously applied “$sort”-stage. | db.mycol.aggregate([{$group : {_id : "$by_user", first_url : {$first : "$url"}}}]) |
| $last | Gets the last document from the source documents according to the grouping. Typically this makes only sense together with some previously applied “$sort”-stage. | db.mycol.aggregate([{$group : {_id : "$by_user", last_url : {$last : "$url"}}}]) |
Pipeline Concept
In UNIX command, shell pipeline means the possibility to execute an operation on some input and use the output as the input for the next command and so on. MongoDB also supports same concept in aggregation framework. There is a set of possible stages and each of those is taken as a set of documents as an input and produces a resulting set of documents (or the final resulting JSON document at the end of the pipeline). This can then in turn be used for the next stage and so on.
Following are the possible stages in aggregation framework −
- $project − Used to select some specific fields from a collection.
- $match − This is a filtering operation and thus this can reduce the amount of documents that are given as input to the next stage.
- $group − This does the actual aggregation as discussed above.
- $sort − Sorts the documents.
- $skip − With this, it is possible to skip forward in the list of documents for a given amount of documents.
- $limit − This limits the amount of documents to look at, by the given number starting from the current positions.
- $unwind − This is used to unwind document that are using arrays. When using an array, the data is kind of pre-joined and this operation will be undone with this to have individual documents again. Thus with this stage we will increase the amount of documents for the next stage.
MongoDB Replication:
Replication is the process of synchronizing data across multiple servers. Replication provides redundancy and increases data availability with multiple copies of data on different database servers. Replication protects a database from the loss of a single server. Replication also allows you to recover from hardware failure and service interruptions. With additional copies of the data, you can dedicate one to disaster recovery, reporting, or backup.
Why Replication?
- To keep your data safe
- High (24*7) availability of data
- Disaster recovery
- No downtime for maintenance (like backups, index rebuilds, compaction)
- Read scaling (extra copies to read from)
- Replica set is transparent to the application
How Replication Works in MongoDB
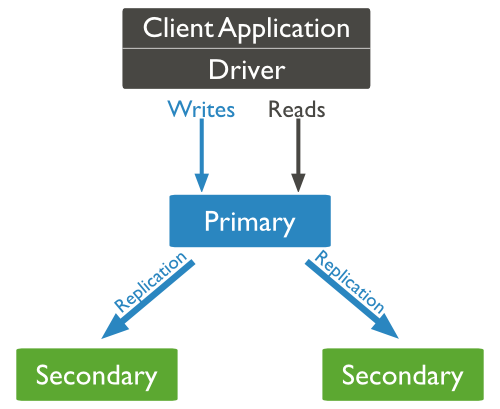
MongoDB achieves replication by the use of replica set. A replica set is a group of mongod instances that host the same data set. In a replica, one node is primary node that receives all write operations. All other instances, such as secondaries, apply operations from the primary so that they have the same data set. Replica set can have only one primary node.
- Replica set is a group of two or more nodes (generally minimum 3 nodes are required).
- In a replica set, one node is primary node and remaining nodes are secondary.
- All data replicates from primary to secondary node.
- At the time of automatic failover or maintenance, election establishes for primary and a new primary node is elected.
- After the recovery of failed node, it again join the replica set and works as a secondary node.
A typical diagram of MongoDB replication is shown in which client application always interact with the primary node and the primary node then replicates the data to the secondary nodes.
Replica Set Features
- A cluster of N nodes
- Any one node can be primary
- All write operations go to primary
- Automatic failover
- Automatic recovery
- Consensus election of primary
Set Up a Replica Set
In this tutorial, we will convert standalone MongoDB instance to a replica set. To convert to replica set, following are the steps −
- Shutdown already running MongoDB server.
- Start the MongoDB server by specifying -- replSet option. Following is the basic syntax of --replSet −
mongod --port "PORT" --dbpath "YOUR_DB_DATA_PATH" --replSet "REPLICA_SET_INSTANCE_NAME"
Example
mongod --port 27017 --dbpath "D:\set up\mongodb\data" --replSet rs0
- It will start a mongod instance with the name rs0, on port 27017.
- Now start the command prompt and connect to this mongod instance.
- In Mongo client, issue the command rs.initiate() to initiate a new replica set.
- To check the replica set configuration, issue the command rs.conf(). To check the status of replica set issue the command rs.status().
Add Members to Replica Set
To add members to replica set, start mongod instances on multiple machines. Now start a mongo client and issue a command rs.add().
Syntax
The basic syntax of rs.add() command is as follows −
>rs.add(HOST_NAME:PORT)
Example
Suppose your mongod instance name is mongod1.net and it is running on port 27017. To add this instance to replica set, issue the command rs.add() in Mongo client.
>rs.add("mongod1.net:27017")
>
You can add mongod instance to replica set only when you are connected to primary node. To check whether you are connected to primary or not, issue the command db.isMaster() in mongo client.
MongoDB Sharding :
Sharding is the process of storing data records across multiple machines and it is MongoDB's approach to meeting the demands of data growth. As the size of the data increases, a single machine may not be sufficient to store the data nor provide an acceptable read and write throughput. Sharding solves the problem with horizontal scaling. With sharding, you add more machines to support data growth and the demands of read and write operations.
Why Sharding?
- In replication, all writes go to master node
- Latency sensitive queries still go to master
- Single replica set has limitation of 12 nodes
- Memory can't be large enough when active dataset is big
- Local disk is not big enough
- Vertical scaling is too expensive
Sharding in MongoDB
The following diagram shows the sharding in MongoDB using sharded cluster.
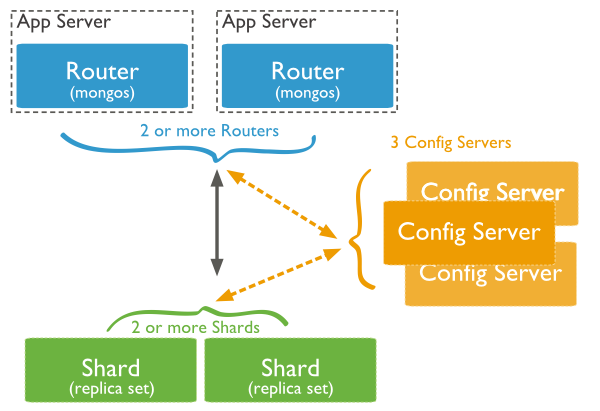
In the following diagram, there are three main components −
- Shards − Shards are used to store data. They provide high availability and data consistency. In production environment, each shard is a separate replica set.
- Config Servers − Config servers store the cluster's metadata. This data contains a mapping of the cluster's data set to the shards. The query router uses this metadata to target operations to specific shards. In production environment, sharded clusters have exactly 3 config servers.
- Query Routers − Query routers are basically mongo instances, interface with client applications and direct operations to the appropriate shard. The query router processes and targets the operations to shards and then returns results to the clients. A sharded cluster can contain more than one query router to divide the client request load. A client sends requests to one query router. Generally, a sharded cluster have many query routers.
No comments:
Post a Comment